We’ve received heaps of positive feedback for our graphics tutorials, so here’s another useful suggestion to get your graphic ideas off the ground. This tutorial will introduce Inkscape, a free software for creating vector graphic files that can be printed with digital direct, a method optimised for T-shirt printing. So here we’ve put together a neat little tutorial for you to create your own cat, or at least the design of one. Enjoy!
Before you get going, please download Inkscape here and install it on your computer. Start the program and follow the steps below. Here we go!
1. Create a circle (1) and choose a colour (2). Then convert the object to a path (3).Tip: press Ctrl to make the circle symmetric. Press Shift to have the circle created from the middle.
2. With the node tool (1), add three additional nodes to the path by double-clicking (2).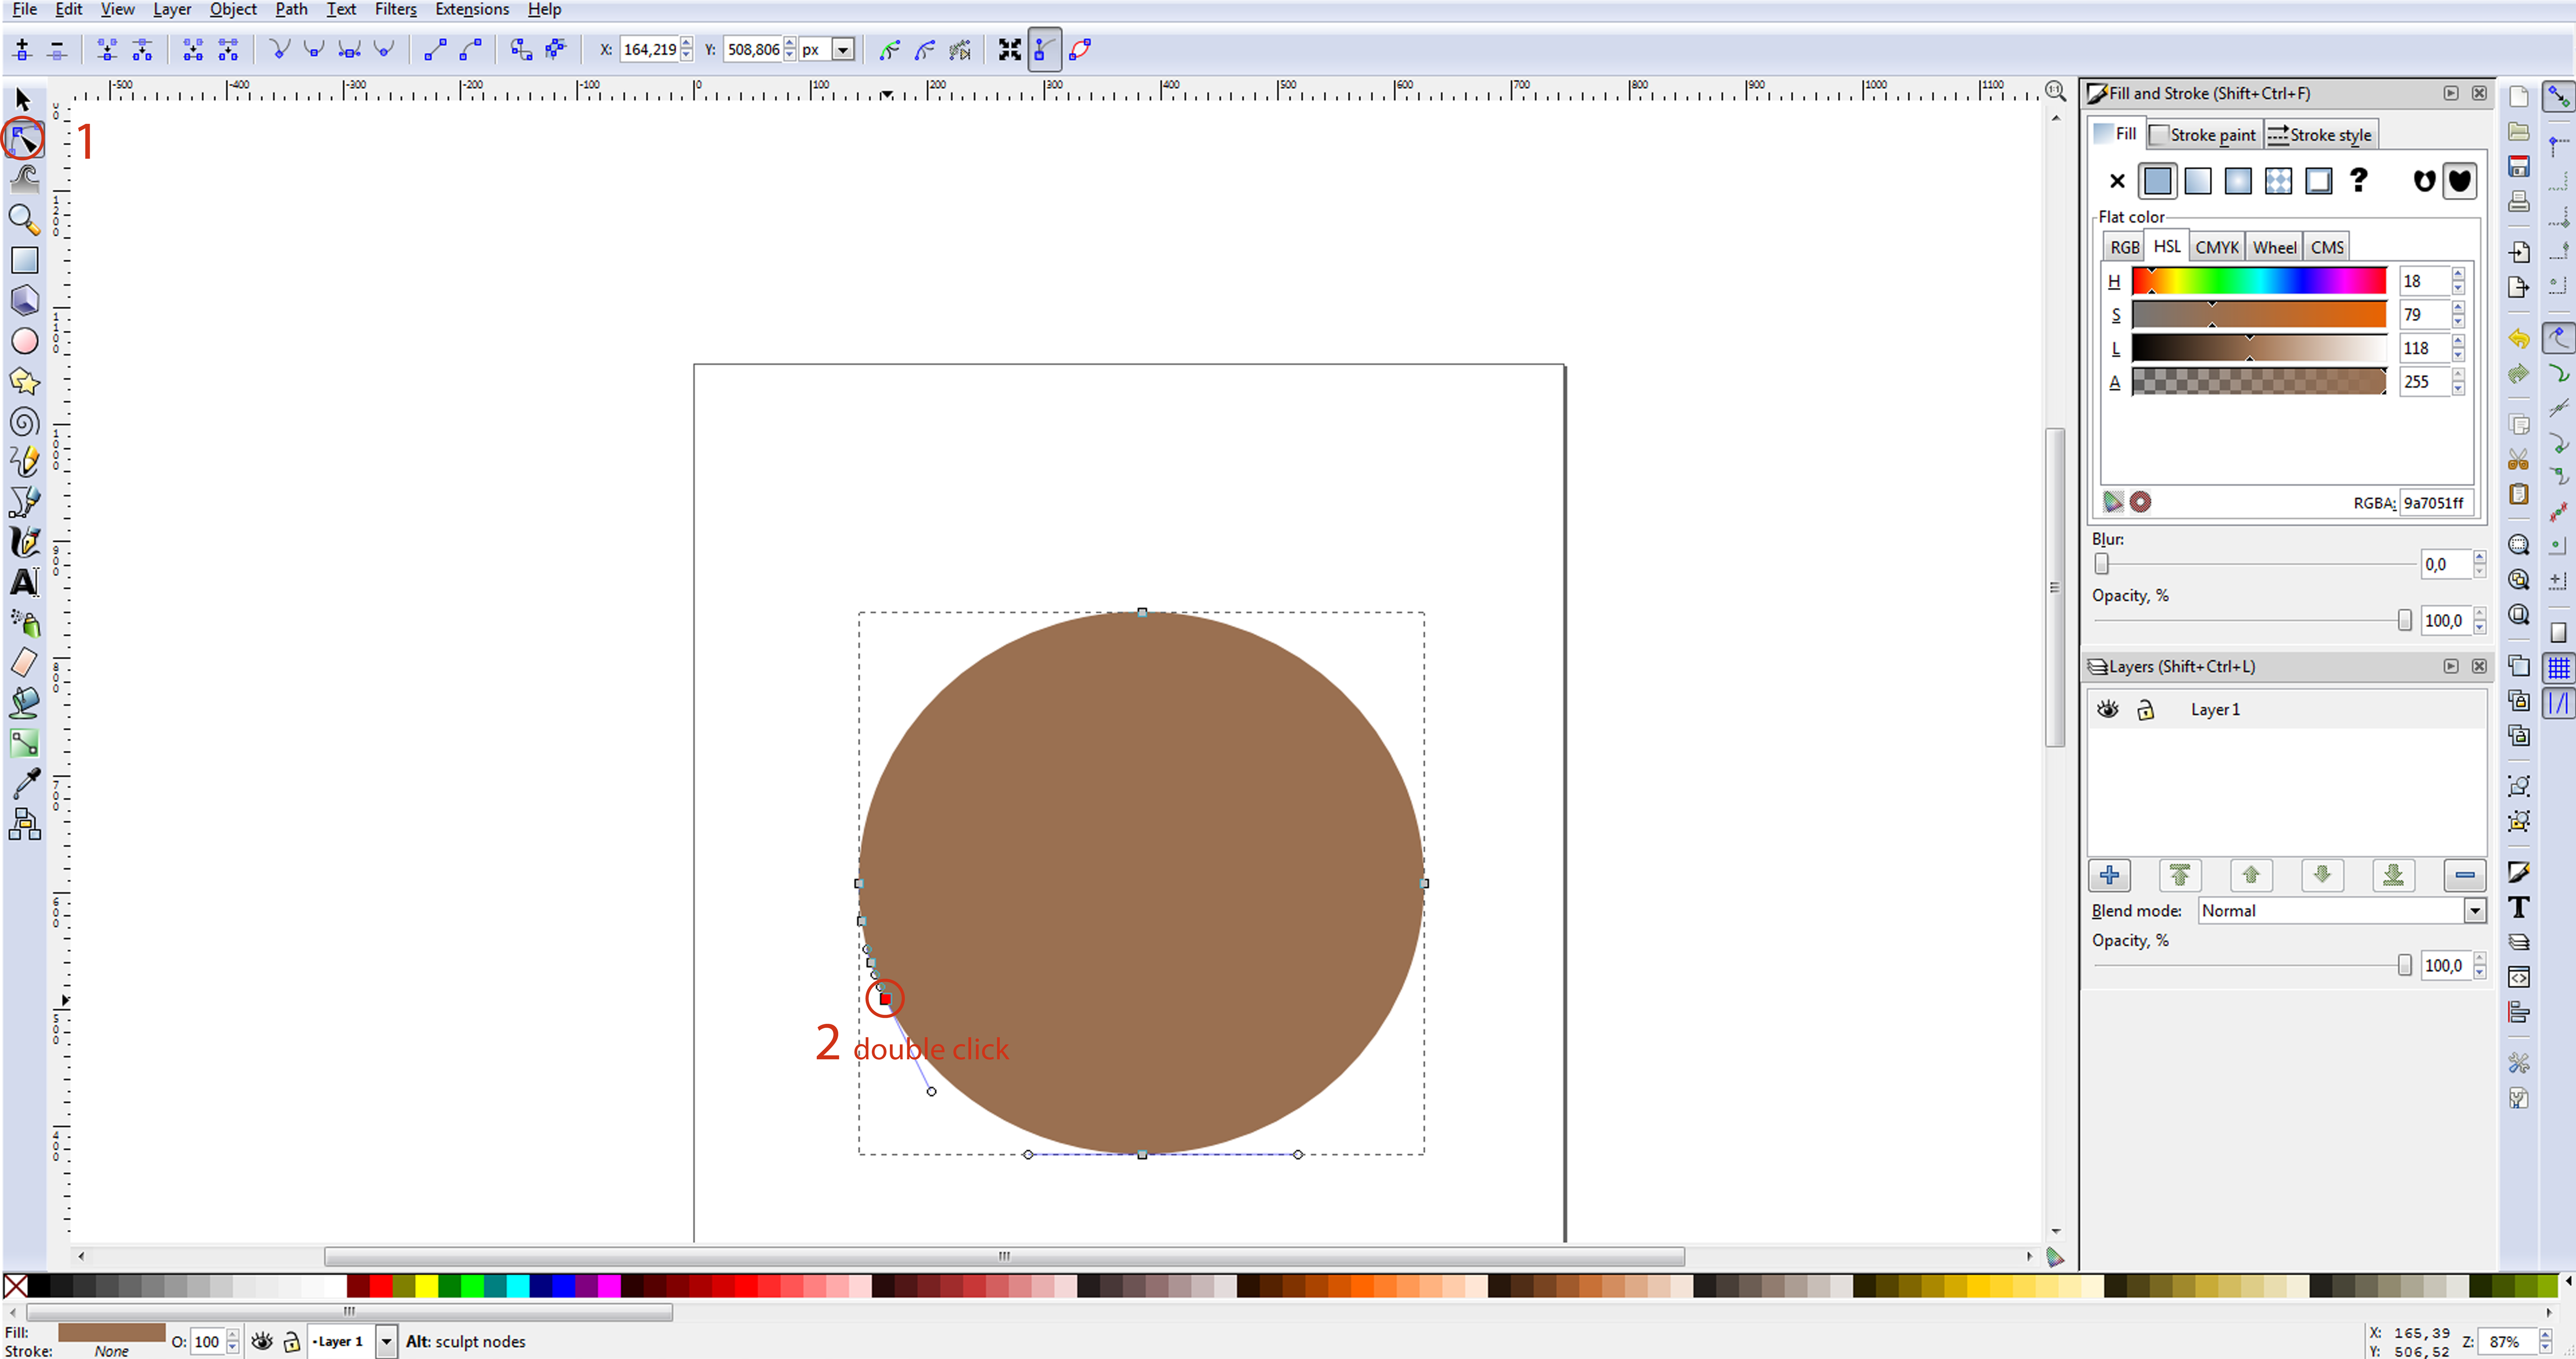
3. Change the form by moving the nodes. Use the different options (1).You can move the nodes directly or grab the handle (2). It may take some getting used to, but you’ll find it much easier when you do it for a second time.Try different options. Press Ctrl + Z to undo an action.
4. Select the shape with the selector (1), copy it (Ctrl + C) and paste it in the same place (Ctrl + Alt+V). Then flip it horizontally (2).
Move the figure to the right by dragging and pressing the Ctrl key. Select both figures and merge them (3).
5. Select the cat’s head, copy it (Ctrl + C) and paste it in the same place (Ctrl+Alt + V). Give the new figure a different colour (1) and shrink it slightly by holding the Shift and Ctrl keys.
By adding nodes and moving them (2), you can change the shape of the small figure.
Use the “blur” option in the colour menu to create a more natural effect (3).
6. To add a layer, press Shift + Ctrl + L to open the “Layers” tool and click on the plus sign (1). Select a name for the new layer, in our case “ears”. Double-click on “Layer 1” to rename the layer, here “head”. Place the “ears” layer below the “head” layer (2). Lock the top layer by clicking the lock icon (3). This will prevent the head of our future cat to be inadvertently distorted.
7. Select the “ears” layer and create the first ear. Use the bezier tool (1) and create a triangle (2). Then move in the ear shape by adjusting nodes and cuffs (3). In the colour menu, choose a colour (4) and deactivate the outline (5). Then repeat the instructions (see 4.) to create the second ear. You do not need to merge the ears.
8. Select the ear (1) before you copy (Ctrl + C) and paste it in the same place (Ctrl+ Alt+ V). Apply another colour to the new shape (2) and shrink it. You may want to modify the shape by adjusting the nodes and handles, and finally add a little blur as mentioned above in point 5.
Then repeat the instructions (see 4.) to create the second ear. No need merging the shapes here, though.
9. Add a new layer and name it “face”. Place it above the other 2 layers. Then lock the layer “ears”.
Add an ellipse to create the cat’s nose. Assign a colour to the nose and transform the object into a path (see point 1).
Add two nodes (1) and move them down while holding the Shift key (2).
10. Follow the steps as described in point 5 to continue creating the nose. Then add a small white ellipse, blur it and place it on the nose.
11. For the eyes, create a black circle (don’t forget to turn the object into paths), add nodes and change the shape (1). Add a white circle over it (2). Above the white circle, add a green circle (3) and blur it slightly. In the last circle, add yet another circle, and soften it by blurring the colour (4). If you wish, you can of course add more circles. Finally, draw the iris with a black circle (5) and small white and blurry circle to create a shiny effect (6). When you’re done with the eye, select all the eye elements, copy and paste them in the right place. Then mirror them to create a second eye. Then move the second eye into the right place.
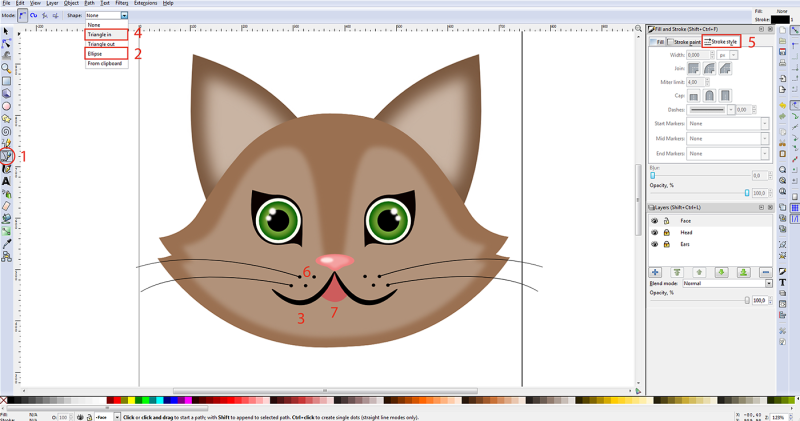
12. Let’s do the mouth now. Take the bezier tool (1) and select the option “ellipse” (2). Create the first lip (3). Adjust the nodes until the object has obtained the desired shape. For whiskers, you can use the style option “Descending Triangle” (4). With the “Fill and Stroke” tool and the “Stroke style” menu, you can thicken the stroke (5). Add a few small circles (6). Now select all of the items, and copy and paste them. Mirror them and place them in the right position. With the bezier tool, you can now create the tongue (7). Move nodes to give it the desired shape. Select the tongue with the “pg dn” (page down) button until it is positioned under the lips.
13. Select the text tool (1) and enter a test. Then open the tool “Text and Font” (2).This option allows you to choose a font you like. Apply the changes (3). Create a curve (4) to define how the text should be bent. Select the path and the text and choose text menu option “Text and Font” (5).
14. Finally, switch off the outline of the curve (1). You can now change the text colour.
We hope this tutorial will help you realise your design ideas. Please share your first creations with us and don’t hesitate to ask us questions!


Thank you for pointing it out, Helmut Kallwass!
We’ve made a mistake while setting up the blog post for several languages, and thanks to your input we’ve now put it straight.
Thank very much for this offer/tutorial! Reading it amuses me because I am a German citizen living in México, working on human genetics after working 14 yrs. in Boston for a major biotech company and am getting more and more corrupted to Spanglish but am viewing European news regularly. This line of yours (Before you get going, please download Inkscape here and install it on your computer. Starte das Programm und folge den untenstehenden Schritten. Los geht’s!) this mix of English and German reminds me that I am truly blue blooded (the tomb of Henry the Lion lies in my hometown Braunschweig) and it seems to me that Lion and Eagle can co-operate in peace to make the world a better place. I agree with the current British sentiment (should I stay or should I go now)…let’s go together.